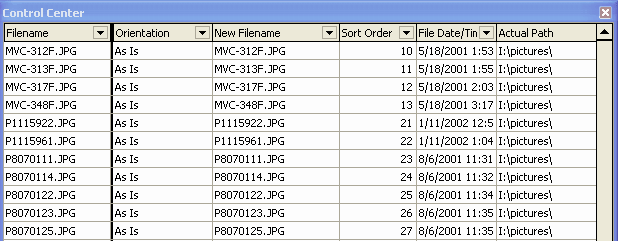
The Control Center is where the Filename Listing would be shown when you load up the images to be processed.
There are 6 columns in the Control Center. All of which are sortable. The easiest way to sort them would be to click on the column header and it will sort in that order. By default, it is sorted based on the filename in the ascending order. Clicking on the column header more than once would toggle it from the Ascending to the Descending order.
All Columns apart from Filename are moveable. You can rearrange them by clicking on the header of that column and moving it to another spot.
Columns
|
Filename
|
This shows Original Filename
|
|
|
|
|
Orientation
|
The first time you load the images to the list, it will take on the Orientation Properties from Settings. After which you may change each image orientation manually using this column. Click on the column and it will reveal a dropdown box containing the various options.
|
|
|
|
|
New Filename
|
This shows the new filename for the images. At the initial load, the new filenames would be the same as the original filename. Use the Preview Filename Change to see the new filename if you select the use of the filename changer.
|
|
|
|
|
|
You can manually change each file name as you require. The filenames need not comply to the 8.3 DOS filename format but it has to comply with the Windows 95 and above filename format. However, you may only have one '.' in the filename and you have to end it with a file extension.
|
|
|
|
|
Sort Order
|
This allows you to define sort order numbers to each file. If you sort by Ascending Order than the higher the number, the lower it would be on the list. The numbers need not be an increment of 1. It can be of any increment. FIles with the same sort order would be grouped next to each other depending on the current order it is at.
|
|
|
|
|
|
Note : In Batch It! v3.x, we allowed a drag and drop method to move columns around but it was slow and difficult to use.
|
|
|
|
|
File Date/Time
|
This shows the date time as stamped on the image files.
|
|
|
|
|
Actual Path
|
This is the actual file directory in which the files are from.
|
Custom Filters


By default, all selected file names are shown. You could filter the list down to just what you need by clicking on the inverted triangle button on the column header and selecting Custom. The Custom Filter would appear as above. To remove the Filters, click on the X at the bottom of the grid next to the filter description as shown above.
Pop-Up Menu
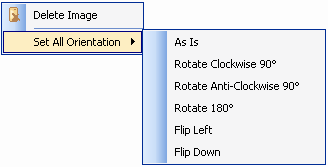
There is a Pop-up menu which you could activate by clicking right-most mouse button anywhere in the Control Center to bring it up. Of course, this does not apply to Delete Image. For those you need to click on the exact row of the image you want to delete the image.
Setting one of the Set All Orientation will reset all orientation to whatever you select. This will replace all orientation changes which you have previously made.
Reset All Filename Change would reset the New Filename Column to the Original Filename